Go to 21 Things for Students (Dig the Data Thing #13)
Quests 1-5 will begin with the basics of creating a spreadsheet to plan a party. You will then move on to advanced skills including charting and formulas.
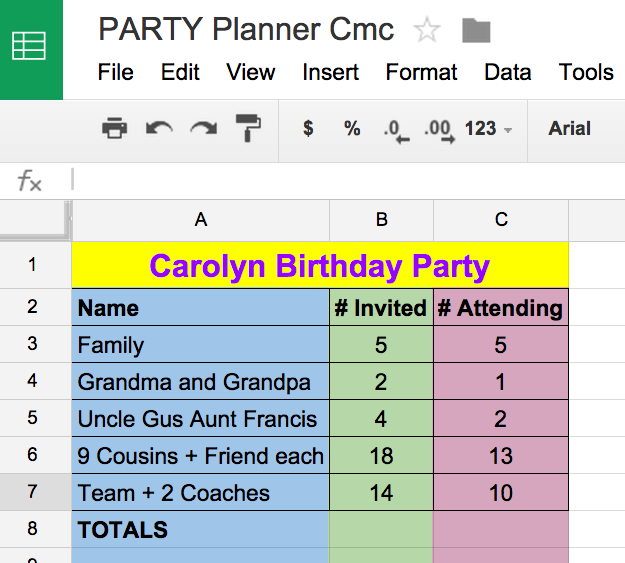
Quest 1 The Party Planning Begins!Imagine that you are going to have a celebration and you will be inviting people to your party. You could use a spreadsheet to keep track of who you invited and how many people are coming. The spreadsheet will do the calculations for you and help you to stay organized. You will learn how to name a document and enter data, learn the difference between a cell, row, and column.
Step 1 - Open a new Excel Spreadsheet and name it: Party Planner.
Step 2 - Title three columns - Name, # Invited, # Attending (make sure all of the titles are capitalized). This is called a Header Row.
Step 3 - List all of the families, neighbors, and groups invited under NAME. You will need to adjust the column width to fit the names of the people invited.
Step 4 - List the number of people invited under # INVITED
Step 5 - List the number of people attending under # ATTENDING
Step 6 - Post your Exel Spreadsheet on your Weebly
Step 2 - Align the text for column B and C so it is in the center.
Step 3 - Select column A and color it light blue, select column B and color it light green, and select column C and make it light pink.
Step 4 - Put a border around each cell.
Step 5 - Have a row labeled TOTALS below the last name and make it bold.
Step 6 - Make the header row bold.
Step 7 - "Fit" the column to the content with a double-click on the line between the columns.
Quests 1-5 will begin with the basics of creating a spreadsheet to plan a party. You will then move on to advanced skills including charting and formulas.
Quest 1 The Party Planning Begins!Imagine that you are going to have a celebration and you will be inviting people to your party. You could use a spreadsheet to keep track of who you invited and how many people are coming. The spreadsheet will do the calculations for you and help you to stay organized. You will learn how to name a document and enter data, learn the difference between a cell, row, and column.
Step 1 - Open a new Excel Spreadsheet and name it: Party Planner.
Step 2 - Title three columns - Name, # Invited, # Attending (make sure all of the titles are capitalized). This is called a Header Row.
Step 3 - List all of the families, neighbors, and groups invited under NAME. You will need to adjust the column width to fit the names of the people invited.
Step 4 - List the number of people invited under # INVITED
Step 5 - List the number of people attending under # ATTENDING
Step 6 - Post your Exel Spreadsheet on your Weebly
Step 2 - Align the text for column B and C so it is in the center.
Step 3 - Select column A and color it light blue, select column B and color it light green, and select column C and make it light pink.
Step 4 - Put a border around each cell.
Step 5 - Have a row labeled TOTALS below the last name and make it bold.
Step 6 - Make the header row bold.
Step 7 - "Fit" the column to the content with a double-click on the line between the columns.